So the last post showed the set of echeveria comptons carousel. Those are not the only plants I've been propagating. In fact there is one shelf in the greenhouse that looked amazing
It was probably a bit of an ebayers dream, on the right we have the e. compton carousel, on the left agave filifera marginata. Probably not as commercial are the middle rows of mangaves. These are the manfreda virginica x agave obscura produced by a friend and the one that flowered last year. Given that Paul died shortly after producing them and didn't give out many, that is probably 30 - 40% of all the ones in existance. The seedlings are coming along and are just hidden behind the larger agave filifera marginatas. There are definitely at least two distinct types forming, so once they have grown a bit more I'll have to update the post on them. Then in the back are the manfreda gutatta bulbils.
The agave filiferas came from my large bowl. It had been left alone for two years and had got a bit out of control.
The main problem was the weeds growing up between the plants. It was getting too painful pulling them out, so time for a quick repot.
I have kept three interesting ones, the largest, a good medium sized and a very pale one. They should look great as a set once the smallest one has filled out a bit. I decide to keep them separate as the large one has turned in to such a feature plant it deserves to be displayed a bit more prominently.
The sad thing is, on the other side of the greenhouse there are another two shelves full of gasteraloes, aloe vipers and more mangaves. I think it is fair to say i have a porpagation problem. This was not all for nothing, I have realised I don't like selling plants on Ebay as it is a hastle, so instead prefer to sell / trade on mass. So during my trip to Norfolk I unloaded most of these. So now I have lots os space again.
Showing posts with label Propagation. Show all posts
Saturday, 15 June 2019
Monday, 3 June 2019
Starting again
The pot that gets the most comments, especially on here, is the large bowl of echeveria comptons carousel. It probably stood out as these are suppose to be difficult, so a bowl full is quite rare.
The mild winter meant they got a bit tatty, so I decided to start again and cut the whole thing up. The plants are at a good stage now, so I thought I would show how to go about dead heading these in the hope that others find it useful. Having cut the heads off, they get cleaned up, all dead leaves removed and checked for any issues. Then place them on a wire shelf to dry. I tend to leave these for a couple of weeks, this not only gives them time to callus over but also for roots to start.
At this point they are ready to be planted up. No water for the first few days and then grandually over the next couple of weeks you can water a little bit more each time. This seems to be a good rule for them in general (after re-potting, after purchasing) - start slowly with the watering.
Don't worry if you lose a few leaves, especially if you get a sudden hot spell at this stage. You will probably find a few leaves mark, but they will grow out and within a couple of months you won't notice. After a couple of weeks if you try to gently move the rosette it should hold firm showing the roots have taken and the plant is good to go.
Not sure what I am going to do with 10 pots full of these. Over the next couple of years they will each form clumps and I would guess two repots will be all that's required to get one back into the large bowl again. I guess I have some good trading material for this summer.
Friday, 17 August 2018
Aloe polyphylla: update 2
So it has been a month since the last aloe polyphylla update. A few heads have been removed to try and root. This seems to be a slow process, time will tell what happens to them. The remaining heads will be left, at least for this year. There are 6 still attached to the original plant.
All except for one of the oringinal leaves have been removed and I'm pleased to say it hasn't slowed the growth.
I'm going to leave it in the ground for another month, then dig it up to protect it over winter. In a couple of years, it should be big enough to plant back out again. A 6 headed plant is going to need a LOT of space!
Monday, 23 July 2018
Aloe polyphyla: update 1
So the aloe polyphylla has been growing nicely over the last few weeks.
The big question has always been what to do with the new heads: leave them all attached or risk removing them. Let's face it a multi head aloe polyphylla would look amazing, my main plant is spectacular enough on it's own, without needing multiple heads.
So a multi-head plant is a given, 2 or 3 heads will be left attached to the old plant. The question has been can the other heads be removed and re-rotted. I had heard that aloe polyphylla can be tricky to re-root, which goes against most succulents. A bit of research suggests that they will root ok, so now for some tests.
There is one little head slightly separate to the rest, so a perfect test subject.
It was cut off with a little bit of the main plant
Someone pointed out that this photo looks like a mole with a very fancy hat. Now they have said that, it's all I can see. Anyway, it will be dried off for a couple of days then planted up and hopefully we'll see roots. If this one works, I can start taking other heads off to give me a few more plants to play with.
Wednesday, 6 June 2018
You know what they say: never throw a succulent away.
So back from the usual winter off-line, a bit later than usual this year. There are good reasons not least an amazing long holiday in Cuba. An actual holiday, not work, or a short break between busy times. That is for another post, as a belated report on winter damage is required.
The London winter was long, wet and with several longer cold spells. The main succulent bed was relatively unscaved and is already looking good again.
The main damage was not here but in the new mixed bed where I was testing an agave x-nigra and an aloe polyphylla. I choose a great year to test them and stupidly didn't cover them at all. The nigra is gone, the centre aloe polyphylla rotted.
The photo above was taken in April, I have been pulling out any loose leaves, and removing any sign of rot. As you can see bellow, it does not look pretty.
So as the this post title suggests there is a general rule that you never throw a succulent away. I have tried before a propagation method called coring: you cut the growth point out and this forces offsets from the centre. It tends to be used to propagate rare or variegated plants. Looking at the aloe, the similarities were obvious.
The aloe was not the only plant damaged like this. The large bowl of variegated agave filifera
The core of the medium sized plant also rotted, so as with the aloe, it was a case of removing rot, damaged leaves and taking the centre back to a clean state.
So a month later and there are already signs of several new plants growing from the core.
As these develop the other leaves will slowly be removed to provide more space. This agave tends to clump, so it will be left to get on with it.
But I know you don't really care about he agave, what about the aloe polyphylla?
There are definitely signs of new growth which is really interesting. I was kicking myself for not protecting the plant in the forcast bad weather, so a clump of aloe polyphyllas would be a far better result than I deserve.
So yet again, that basic rule proves to be true. Never throw a sucuelnt away!
Friday, 14 October 2016
Echeveria John Catlin
This is a strange one: a beautiful white echeveria, but I know very little about it and have not see it anywhere else. It was purchased at the BCSS national show 8 years ago, from Eau Brink cactus nursery, so a really good source and I would have expected to find more out there.
This was it back in 2011, as you can see it has more pointed leaves than Lauii but is just a white and attention grabbing.
It is one that never offsets, and despite all my efforts, none of my tricks have worked to get that first pup. Then I tried top cutting and again nothing. The top rooted, thankfully, but the base did nothing. At that point I sort of gave up trying at least in the short erm.
In one last effort I have been letting it grow, forming that perfect trunk.
So a few weeks back I took the plunge and top cut it again, the top was planted up and I was pretty certain it would root without too much problems.
The big question would a few extra years of experience top cutting pay off with offsets forming on the base trunk.
Yep three precious little babies on that trunk today. You can imagine how pleased I am, even if it isn't the best time for them to have formed. You can guarantee that this is one plant that will be watched very carefully over winter.
Obviously this success has gone to my head and I am now picturing a greenhouse full of them in a couple of years. To be honest I'm not going to push my luck, I'll be happy if these offsets make it to rooted established plants.
Tuesday, 31 May 2016
Let's talk echeveria 'Compton Carousel'
One of those stop in your tracks plants, if you have seen one chances are it is on your wish list.
That is where the fun starts as it is not always easy to come by. In the UK it is fairly simple you can simply go to Southfield Catus (home of cactusland). I always tell people, look there first and find out the price, as if you buy it off ebay you'll pay 2 to 3 times as much. I understand in the USA it is a lot harder to find, although there will be somewhere with a constant supply at more reasonable price.
Right so you have searched and found your plant, you get it home and settle back to enjoy your prize only for it to suddenly up and die. You are devastated; apart from the money, you're back to trying to track one down again. You treated it the same as your other plants, it is an echeveria after all so shouldn't be that fussy. So what went wrong?
I am always getting asked about how I treat them, so it's time for a post on what I have found works for me.
Firstly and this is important. What works for me may not work for you. The most common mistake with this plant is to think as an echeveria it is simple and will cope with the usual succulent stuff. I find them to be sensitive to light, heat and water.
Light. Mine are grown in the the greenhouse in the UK, this means they do not get direct sunlight. I have not tried one outside but in full sun I would expect them to burn. The leaves are not strong at all and do not need an excuse to curl up and die. The same goes for low light, they are prone to get leggy.
Heat. They do not seem to cope with extreme heat and even in the UK on hot days in the green house they can go from nice plant to mess. It goes without saying that they do not cope with cold, I did leave one in the green house over this winter which went down to -3C. But that was totally dry from November - March.
Water. Where most people go wrong as they are really prone to rot and drying out. This is especially true as they settle into a new home or when taking offsets. I tend to give them half the amount of water other plants get, whenever I move them. Initially you want the soil to be damp not wet and never get water in the crown. If it is hot, keep a eye on the water as they will need to be watered, as hot and too dry will cause you problems as well. Once settled and growing you can go back to a more normal water regime, but still avoid water in the crown.
Linked to all of this is the soil mix. It must be free draining as you do not want plants sitting in any water. It also needs to have some food; they are weak plants and need all the help they can get. I use blood, fish and bone in the mix and feed them one a month from May - July.
It is vital to work out what is required for your location, it will vary, but watch your plants and they will tell you what is working. Once you work that out, they are easy:
So you have the basics and your plant is alive. At this point it will start to behave like any other echeveria and will want to offset. Again there are a few tricks.
Firstly they throw out quite a few white pups. As amazing as they are, treat them like flowers. Admire while there are around and know they will die. I have managed to get one through two seasons, most last only one. Except that and you will enjoy them and save yourself a lot of heartbreak.
There are a few tricks you can use to get offsets. Feed you plants as mentioned before, a strong plant will offset nicely. If things are not happening quick enough, forcing the plant in lower light. The elongated stem will produce lots of pup.
If you leave the leaves on you will find you get offsets like the one on the left in the photo above. If you take the leaves off you will get good offsets on the trunk as can be seen as well. Remember this plant is weak, so some transplanted offsets will not root. Do not treat them like you do for other offsets. A lot less water to start with, then intensive care monitoring the watering building it up little by little over a month.
To be honest I tend to do the reverse of my normal and propagate by top cutting, that way you get lots of plants in the original pot and as can be seen form the photos. The stems on the main plant form roots and stand more chance to re-root, this seems far more successful than trying to remove pups.
Top cutting a plant once it has roots visible, will give a nice new plant. Remember take the watering slow to start with and keep it in the shade. The plants that remain in the original pot will grow quickly to fill the space and give you a pot full of plants by the end of that season. These will eventually get leggy, offset, and send out their own roots and the process can start again.
As you can see once you have your routine down, plants will not be a problem. Quite the reverse and you will have the alternate problem: keep or sell. So far I have not sold a single plant, a lot have been given away to friends. for me this is a plant grown for the pleasure, not money. My OH on the other hand likes to work out what she could buy with the proceeds from a single pot (there are 15 plants in the photo above).
I would like to say I never loose plants, but of course I do. Especially when trying to root offsets. Accept it and keep note of what works and what doesn't. People who have followed for a while, know I like my experiments and recording my results. For this plant I physically write down when I water and feed offsets and the outcome.
Finally settle back and enjoy them and the looks of envy you get from any other succulent lovers who see your plants still alive. Just don't tell anyone your secrets!
I hope this helps, please feel free to leave comments, either without or without your name. Let me know if I have missed anything and what works for you.
![]() |
| My second plant in May 2013, the first suddenly decided to die. |
Right so you have searched and found your plant, you get it home and settle back to enjoy your prize only for it to suddenly up and die. You are devastated; apart from the money, you're back to trying to track one down again. You treated it the same as your other plants, it is an echeveria after all so shouldn't be that fussy. So what went wrong?
![]() |
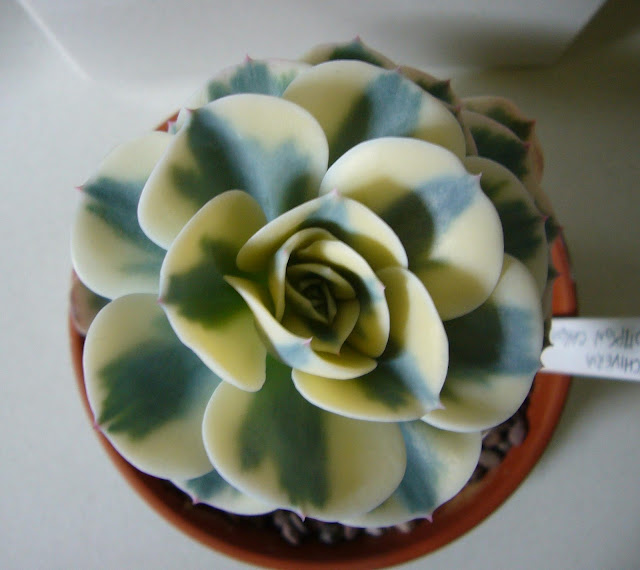
| This years flowers, the best to date. |
Firstly and this is important. What works for me may not work for you. The most common mistake with this plant is to think as an echeveria it is simple and will cope with the usual succulent stuff. I find them to be sensitive to light, heat and water.
Light. Mine are grown in the the greenhouse in the UK, this means they do not get direct sunlight. I have not tried one outside but in full sun I would expect them to burn. The leaves are not strong at all and do not need an excuse to curl up and die. The same goes for low light, they are prone to get leggy.
Heat. They do not seem to cope with extreme heat and even in the UK on hot days in the green house they can go from nice plant to mess. It goes without saying that they do not cope with cold, I did leave one in the green house over this winter which went down to -3C. But that was totally dry from November - March.
Water. Where most people go wrong as they are really prone to rot and drying out. This is especially true as they settle into a new home or when taking offsets. I tend to give them half the amount of water other plants get, whenever I move them. Initially you want the soil to be damp not wet and never get water in the crown. If it is hot, keep a eye on the water as they will need to be watered, as hot and too dry will cause you problems as well. Once settled and growing you can go back to a more normal water regime, but still avoid water in the crown.
Linked to all of this is the soil mix. It must be free draining as you do not want plants sitting in any water. It also needs to have some food; they are weak plants and need all the help they can get. I use blood, fish and bone in the mix and feed them one a month from May - July.
It is vital to work out what is required for your location, it will vary, but watch your plants and they will tell you what is working. Once you work that out, they are easy:
![]() |
| My collection of plants May 2016, all from that one original plant |
Firstly they throw out quite a few white pups. As amazing as they are, treat them like flowers. Admire while there are around and know they will die. I have managed to get one through two seasons, most last only one. Except that and you will enjoy them and save yourself a lot of heartbreak.
There are a few tricks you can use to get offsets. Feed you plants as mentioned before, a strong plant will offset nicely. If things are not happening quick enough, forcing the plant in lower light. The elongated stem will produce lots of pup.
If you leave the leaves on you will find you get offsets like the one on the left in the photo above. If you take the leaves off you will get good offsets on the trunk as can be seen as well. Remember this plant is weak, so some transplanted offsets will not root. Do not treat them like you do for other offsets. A lot less water to start with, then intensive care monitoring the watering building it up little by little over a month.
To be honest I tend to do the reverse of my normal and propagate by top cutting, that way you get lots of plants in the original pot and as can be seen form the photos. The stems on the main plant form roots and stand more chance to re-root, this seems far more successful than trying to remove pups.
Top cutting a plant once it has roots visible, will give a nice new plant. Remember take the watering slow to start with and keep it in the shade. The plants that remain in the original pot will grow quickly to fill the space and give you a pot full of plants by the end of that season. These will eventually get leggy, offset, and send out their own roots and the process can start again.
![]() |
| Flower stalk with variegated laves as well. |
I would like to say I never loose plants, but of course I do. Especially when trying to root offsets. Accept it and keep note of what works and what doesn't. People who have followed for a while, know I like my experiments and recording my results. For this plant I physically write down when I water and feed offsets and the outcome.
Finally settle back and enjoy them and the looks of envy you get from any other succulent lovers who see your plants still alive. Just don't tell anyone your secrets!
I hope this helps, please feel free to leave comments, either without or without your name. Let me know if I have missed anything and what works for you.
Tuesday, 19 August 2014
Time to cut up some plants.
It has been a summer of two halves weather wise; June & July were lovely and hot, then August arrived and it has been much colder and wetter. So with wetter weather over the weekend it was time to rectify some of the neglect and get in the greenhouse. With all the work going on with planting the succulent rockeries everything else has taken a back seat. First job to sort out some of the more unkempt plants.
Some like xGraptosedum 'Medterranean Mystery' have suffered from lack of water and low light.
A hybrid apparently common in Europe it is a lovely little plant and quite tough. I am trying one outside unprotected this winter as it is been fine under rain covers before. As they grow they develop woody stalks and at some point they need to be tidied up. I simply cut all the heads off plant root them and bin the old plant. It helps to keep them fresh and gives me new plants for swaps. I managed to get three pots like this one, so not going to go short next year.
That type of tidying was more common with the lack of care, here is echeveria corrinea x echeveira rosea before
Another branching hybrid with really god hardiness and flowers. I really must take better care of it as when well looked after it is stunning.
I decided to leave the top section as one, next year will be the year I finally look after it properly. Then it can take a place in the rockery looking like the plant it should be.
In other cases it is more about getting more plants. I grew a set of ech. subrigida x ech. peacocki from seed a couple of years ago. The plants grew into several forms and I have been trying to get more of my favourite forms.
I love the red edges to this form and it has a good pale blue/white colour. Having top cut it last year, the offsets are now big enough to be taken off.
I am getting better at not rushing removing offsets, I'll leave the others until next spring and decide then if I want to grow them as a clump or cut them up as well.
It doesn't always go according to plan. This is echeveria 'rainbow',
I top cut it last year to encourage offsets, which it did, only not quite as planned.
Yes there are lots of offsets, but all have become almost totally white. Looking at them I can't see any that I think would survive in their own. I guess this one is staying as it is, while we wait and see what happens next. Hopefully they will develop more green and stems so they can be removed.
White offsets seem to be a trend at the moment. Here is one of my echeveria 'Compton Carousel', I took all the lower leaves of at the end of last year to encourage offsets.
I like to call these pure white plants "ghosts", with no chlorophyll they will not survive on their own as they can not feed themselves. It will be interesting to see if they do better as they are growing as branches of a plant. Normally I top cut the plant and let the offsets take over, this one has been left and instead the three largest normal offsets removed and potted up.
I have so far always resisted selling these, I get asked a lot. Instead all the offsets are used as swaps and presents for friends. I mentioned in the last post how I dread people turning up to my house with plants. Strangely I have never had anyone look upset when I turn up with one of these as a little present.
Friday, 13 September 2013
Will they germinate
I posted before that it is a good year for seeds on the aloes, with seeds pods on the a. striatula and a. aristrata for the first time. The problem with aloes seed pods is that they tend to open suddenly, resulting in the lose of all the seeds. So there have been twice daily checks and today found the a. aristrata pods starting to open.
Opening them carefully revealed a fair number of seeds.
Now a sensible person, would realise they don't need more of the same plants, have no space to over winter them, and has little luck with seedlings anyway. But then a sensible person probably wouldn't have a succulent obsession in the UK. So I will sowing them and seeing happens.
Friday, 6 September 2013
Update on propagation experiment
One of the more drastic methods to propagate agaves is called coring. This involves damaging the growth tip forcing it to produce multiple heads. There are several methods, the most common being to cut the growth point out, or to cut the plant in half. I have always wanted to try it, but never had a suitable plant until this summer. Then along came this agave filifera, with very lopsided variegation.
It was starting to distort and didn't look great, so seemed a suitable subject. The top was cut out and the variegated leaves removed. A first attempt was never going to go 100% smoothly, but the actual coring could have gone better Too much was taken out leaving only a few leaves.
The photo above was take after a few weeks. Already new plants are forming. A month or so later and it is starting to become clear that one has good variegation and the other less so.
A few weeks after that and they are really starting to take form. The variegated one looks really good, with the other looking almost pure green. There are also a couple of small ones starting to form in the middle.
More of a long term project this one, by the end of next summer the full results should be in. If nothing else at least there is one good variegated plant. I would be willing to try it again, taking a little more care with the cutting this time.
Friday, 9 August 2013
Will there be seeds
It's not only in the greenhouse that the aloes have been busy, the two flowering garden aloes also have seed pods ripening. Strangely both the aloe aristratas have one seed pod each, from the last flower on the stem. More exciting is the aloe striatula which has a good collection of seed pods.
I am not sure if these are self fertile, if not they must be hybrids with the a. aristrata. Sadly this doesn't seem to produce the interesting plants you would hope for, taking the less interesting parts of both parents.
I will just have to try germinating them and see what they turn into.
Tuesday, 25 June 2013
Never say never
It is common knowledge that certain echeverias can be propagated through leaves, the general opinion is that variegated leaves will produce normal plants. This is so ingrained I have even posted that myself. It is apt that this is first post returning to plants; Paul was a firm believer in testing everything as you never know what will happen. I am not against experiments, so I test every plant I get just to see if it will produce new plants, and if any turn out variegated.
The latest experiment was with leaves from echeveria 'Compton Carousel' and look what happens:
I am waiting to see if it throws out any more green leaves, otherwise as the old leaf dies it will die to. It is a lovely oddity though and while it stays almost pure white I think as suitable name is echeveria "Compton Carousel Ghost"
Thursday, 16 May 2013
Propagation update.
Having posted about my favourite propagation trick (here) I thought I would show how the plants are doing. So here is the plant on the 23rd of April, just after top cutting.
The three heads were potting up and have now started to root. And the new plants are forming nicely on the stems of the bases.
I tend to strip the leaves off around the new plants, but leave the rest. This seems to give me the best results and quickest growth. It looks like I'll get about 8 plants from that stem. On one of the others it has given a boost to the plants that were already forming, as well creating some new ones.
So along with the three original heads, there should be about 20 new plants. Not bad for one little pot.
Subscribe to:
Posts (Atom)


